Recipe Card
Shatteringly crisp outside, pillowy inside — authentic medu vada with a foolproof shaping technique and fresh coconut chutney. Includes oil-temperature guide and make-ahead tips.
Ingredients
- 2 cups (400g) whole white urad dal, rinsed
- 1 tbsp rice flour (optional, for extra crispness)
- 2 green chillies, very finely chopped
- 1-inch piece of ginger, grated
- 1 tsp cumin seeds, lightly crushed
- 1 tsp black peppercorns, coarsely crushed
- 8-10 curry leaves, finely chopped
- 2 tbsp finely chopped coriander leaves (optional)
- 1/4 tsp asafoetida (hing)
- 1.25 tsp salt, or to taste
- Oil, for deep frying (about 1 litre)
- For the coconut chutney:
- 1 cup freshly grated coconut (or frozen, thawed)
- 2 tbsp roasted chana dal (dalia / putana)
- 1-2 green chillies
- 1/2-inch piece of ginger
- 1/2 tsp salt, or to taste
- 1/2 cup water, plus more as needed
- For the chutney tempering:
- 1 tsp oil
- 1/2 tsp mustard seeds
- 1 dried red chilli
- 6-8 curry leaves
- A pinch of asafoetida (hing)
Instructions
- Soak the dal. Rinse the urad dal well and soak in plenty of water for 4-5 hours. The grains should swell, turn bright white, and break easily when pressed between your fingers. Do not soak overnight or beyond 6 hours — over-soaked dal makes a watery batter. Drain completely in a colander for 10-15 minutes; shake off every bit of surface water.
- Grind to a thick, fluffy batter. Grind the drained dal in batches, adding water strictly a tablespoon at a time. You are aiming for a very thick, smooth, almost stiff batter — thicker than idli batter, like soft dough that holds peaks. It should feel silky with no grit. Scrape down the jar between batches and rest the mixer so the batter does not heat up. Transfer to a large bowl.
- Whip in the air. Beat the batter vigorously with your hand for 3-4 minutes, using a lifting and folding motion to incorporate air. You will feel it lighten and turn fluffier. Now do the float test: drop a chickpea-sized ball into a bowl of water. If it floats promptly, the batter is ready. If it sinks or hovers, whip for 2-3 more minutes and test again. This aeration is what makes the inside soft.
- Season the batter. Fold in the rice flour (if using), green chillies, ginger, cumin, crushed pepper, curry leaves, coriander, hing, and salt. Mix just until combined — over-mixing now knocks out the air you just beat in. The batter should still be thick enough to hold a shape on your palm.
- Make the coconut chutney. Grind the coconut, roasted chana dal, green chillies, ginger, salt, and half a cup of water to a smooth, thick chutney, adding water a splash at a time — it should be spoonable, not runny. Heat the teaspoon of oil in a tadka pan, pop the mustard seeds fully, add the red chilli, curry leaves, and hing, and pour over the chutney. Stir and set aside.
- Heat the oil to the right temperature. Pour oil into the kadhai to a depth of at least 2-3 inches and heat over medium heat to 170-175°C. Without a thermometer, test it: drop in a tiny ball of batter. It should sink briefly, then rise steadily to the surface within 3-4 seconds, surrounded by lively bubbles, and turn golden in about 2 minutes. If it browns in under a minute, the oil is too hot (crisp outside, raw inside); if it sits on the bottom lazily, the oil is too cool (greasy vadas).
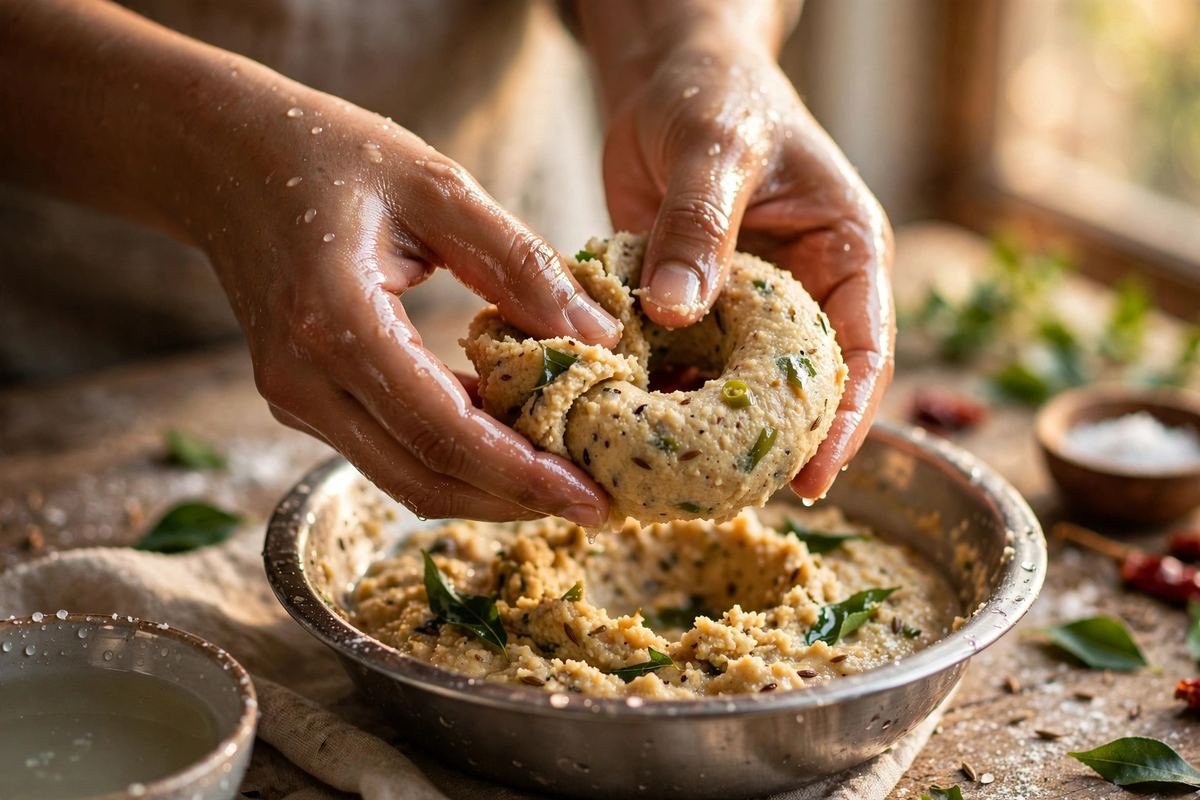
- Shape the vadas. Wet your palms with water (this stops sticking). Take a lemon-sized ball of batter and flatten it into a thick disc about 3 inches across on your palm. Poke a hole through the centre with your wet thumb or index finger and widen it slightly — the classic doughnut shape. Beginner method: place a square of greased banana leaf or plastic sheet on your palm, shape the vada on it, make the hole, then flip it off into the oil. Do not worry about perfect circles; rustic vadas fry up just as delicious.
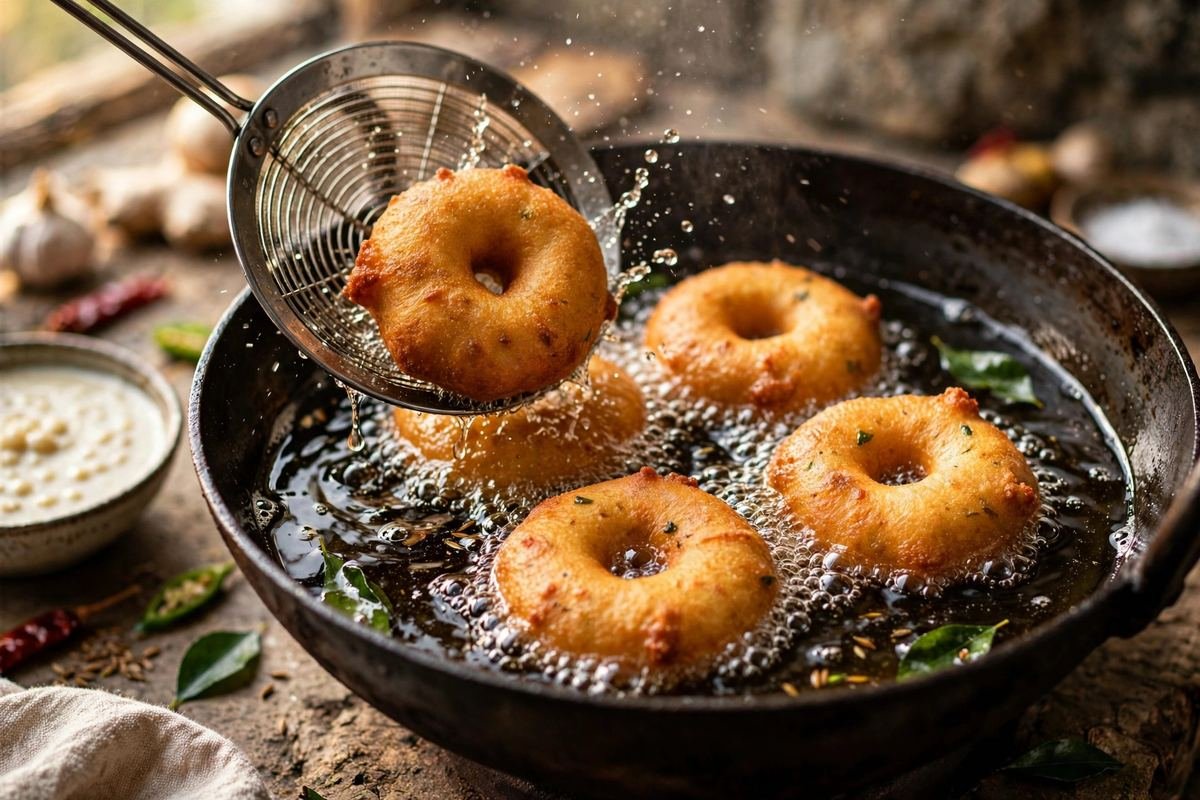
- Fry in small batches. Gently slide 3-4 vadas into the hot oil — never crowd the kadhai, or the temperature drops and the vadas turn greasy. They will sink, then rise. Fry for 2 minutes, then flip and fry another 2-3 minutes until deep golden brown and crisp all over. The bubbling will quieten noticeably when they are done — that is moisture leaving, and quiet oil means a crisp vada.
- Drain and keep crisp. Lift out with a slotted spoon, let the oil drip back for a few seconds, and drain on a wire rack or paper towels. Between batches, let the oil come back up to temperature for a minute — this pause is essential for consistently crisp vadas. Serve within 20-30 minutes for maximum crunch.
Tip: Read through the full post below for step-by-step photos, pro tips, variations and FAQs before you start cooking.
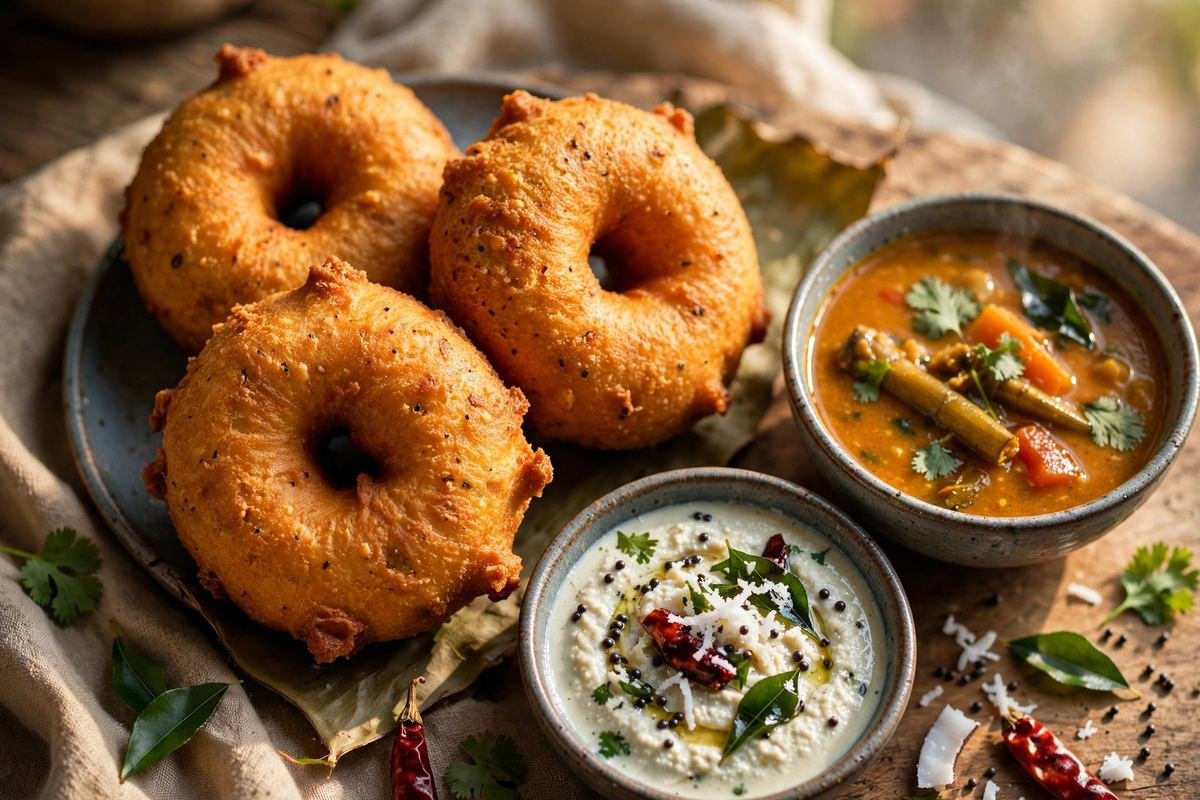
If idli is South India’s gentle breakfast, medu vada is its bold, crunchy counterpart. These golden doughnut-shaped fritters — crisp and lacy on the outside, soft and fluffy within — are made from the same humble urad dal as idli, but where idli whispers, vada crackles. Dunked in hot sambar until it soaks through, or dragged through fresh coconut chutney, a well-made medu vada is one of the great textural experiences in Indian food.
“Medu” means soft in Tamil, and the name is the whole promise: soft inside. The vada’s history runs deep in Tamil cuisine — ulundu vadai, as it is called in Tamil Nadu, has been festival and temple food for centuries, offered as prasadam and made in enormous batches for weddings. Its distinctive doughnut shape is not just for looks: the hole ensures the thick batter cooks through evenly in hot oil, so you never bite into a raw centre. Street vendors across South India shape vadas by hand at astonishing speed, slapping the batter between wet palms and sliding each ring into the kadhai without a moment’s hesitation.
For the home cook, medu vada has a reputation for being tricky, and I will be honest — it demands more attention than idli. The batter must be thick and well-aerated, the oil temperature exactly right, and the shaping takes a little practice. But every one of those variables is controllable, and this recipe controls them for you: the precise batter consistency to aim for, the water test for oil temperature, two foolproof shaping methods (including one that needs no skill at all), and a fresh coconut chutney to serve alongside. The result is vadas that shatter when you bite them and stay crisp long after frying.
What makes medu vada special is the contrast. The exterior fries into a deep golden, craggy crust while the inside steams itself soft and airy — two textures from a single batter, achieved purely through technique. Get it right once, and you will understand why no South Indian tiffin plate is complete without one.
Why You’ll Love This Recipe
- Genuinely crispy vadas — the exact batter thickness and oil temperature for a shattering crust that stays crisp.
- Two shaping methods — the traditional hand technique plus a foolproof beginner method, both explained step by step.
- Fluffy, never dense centres — the aeration trick that keeps the inside pillowy instead of doughy.
- Fresh coconut chutney included — the perfect cool, creamy accompaniment, made in five minutes.
- Make-ahead friendly — grind the batter the night before; shaping and frying take 40 minutes in the morning.
- Festival and guest-worthy — vadas are celebration food, and homemade ones beat any shop-bought version.
Key Ingredients Explained
Whole white urad dal is the entire recipe — there is no rice here, unlike idli. Use whole (un-split) skinned urad dal, and make sure it is fresh; old dal grinds poorly and fries up dense. Soak for 4-5 hours, no longer — over-soaked dal absorbs too much water and makes a slack batter that drinks oil. Drain it thoroughly; every extra drop of water in the grinder thins the batter.
The batter consistency is the make-or-break factor, so understand what you are aiming for: thick enough to hold its shape on your fingers, smooth and fluffy like whipped cream, with no visible water. Grind with the absolute minimum water — add it a tablespoon at a time. After grinding, whip the batter vigorously with your hand for 3-4 minutes, lifting and folding to beat in air. The classic test: drop a small ball of batter into a bowl of water. If it floats, the batter is aerated and ready; if it sinks, whip more. This one test predicts your vadas better than anything else.
Seasonings are simple: finely chopped green chillies, grated ginger, crushed black pepper, cumin seeds, chopped curry leaves, and salt. Keep the add-ins finely chopped and modest — chunky bits tear the vada’s surface and make shaping harder. A tablespoon of rice flour is my insurance policy for extra crispness; it is optional but recommended for beginners.
For frying, use a neutral oil with a high smoke point — groundnut, sunflower, or refined vegetable oil. You need enough for deep frying: the vadas must float freely, at least 2-3 inches deep in a kadhai. For the coconut chutney, use fresh coconut if possible (frozen grated coconut, thawed, is the next best); desiccated coconut gives a noticeably drier chutney. Roasted chana dal (dalia) thickens the chutney and adds body without dulling the coconut flavour.
Equipment You’ll Need
- A powerful mixer grinder or wet grinder
- A deep, heavy kadhai or wok for frying
- A slotted spoon or spider strainer
- A kitchen thermometer (helpful but optional — the water/batter test works too)
- Paper towels or a wire rack for draining
- For chutney: a mixer grinder and a small tadka pan
- 2 cups (400g) whole white urad dal, rinsed
- 1 tbsp rice flour (optional, for extra crispness)
- 2 green chillies, very finely chopped
- 1-inch piece of ginger, grated
- 1 tsp cumin seeds, lightly crushed
- 1 tsp black peppercorns, coarsely crushed
- 8-10 curry leaves, finely chopped
- 2 tbsp finely chopped coriander leaves (optional)
- 1/4 tsp asafoetida (hing)
- 1.25 tsp salt, or to taste
- Oil, for deep frying (about 1 litre)
- For the coconut chutney:
- 1 cup freshly grated coconut (or frozen, thawed)
- 2 tbsp roasted chana dal (dalia / putana)
- 1-2 green chillies
- 1/2-inch piece of ginger
- 1/2 tsp salt, or to taste
- 1/2 cup water, plus more as needed
- For the chutney tempering:
- 1 tsp oil
- 1/2 tsp mustard seeds
- 1 dried red chilli
- 6-8 curry leaves
- A pinch of asafoetida (hing)
- Soak the dal. Rinse the urad dal well and soak in plenty of water for 4-5 hours. The grains should swell, turn bright white, and break easily when pressed between your fingers. Do not soak overnight or beyond 6 hours — over-soaked dal makes a watery batter. Drain completely in a colander for 10-15 minutes; shake off every bit of surface water.
- Grind to a thick, fluffy batter. Grind the drained dal in batches, adding water strictly a tablespoon at a time. You are aiming for a very thick, smooth, almost stiff batter — thicker than idli batter, like soft dough that holds peaks. It should feel silky with no grit. Scrape down the jar between batches and rest the mixer so the batter does not heat up. Transfer to a large bowl.
- Whip in the air. Beat the batter vigorously with your hand for 3-4 minutes, using a lifting and folding motion to incorporate air. You will feel it lighten and turn fluffier. Now do the float test: drop a chickpea-sized ball into a bowl of water. If it floats promptly, the batter is ready. If it sinks or hovers, whip for 2-3 more minutes and test again. This aeration is what makes the inside soft.
- Season the batter. Fold in the rice flour (if using), green chillies, ginger, cumin, crushed pepper, curry leaves, coriander, hing, and salt. Mix just until combined — over-mixing now knocks out the air you just beat in. The batter should still be thick enough to hold a shape on your palm.
- Make the coconut chutney. Grind the coconut, roasted chana dal, green chillies, ginger, salt, and half a cup of water to a smooth, thick chutney, adding water a splash at a time — it should be spoonable, not runny. Heat the teaspoon of oil in a tadka pan, pop the mustard seeds fully, add the red chilli, curry leaves, and hing, and pour over the chutney. Stir and set aside.
- Heat the oil to the right temperature. Pour oil into the kadhai to a depth of at least 2-3 inches and heat over medium heat to 170-175°C. Without a thermometer, test it: drop in a tiny ball of batter. It should sink briefly, then rise steadily to the surface within 3-4 seconds, surrounded by lively bubbles, and turn golden in about 2 minutes. If it browns in under a minute, the oil is too hot (crisp outside, raw inside); if it sits on the bottom lazily, the oil is too cool (greasy vadas).
- Shape the vadas. Wet your palms with water (this stops sticking). Take a lemon-sized ball of batter and flatten it into a thick disc about 3 inches across on your palm. Poke a hole through the centre with your wet thumb or index finger and widen it slightly — the classic doughnut shape. Beginner method: place a square of greased banana leaf or plastic sheet on your palm, shape the vada on it, make the hole, then flip it off into the oil. Do not worry about perfect circles; rustic vadas fry up just as delicious.
- Fry in small batches. Gently slide 3-4 vadas into the hot oil — never crowd the kadhai, or the temperature drops and the vadas turn greasy. They will sink, then rise. Fry for 2 minutes, then flip and fry another 2-3 minutes until deep golden brown and crisp all over. The bubbling will quieten noticeably when they are done — that is moisture leaving, and quiet oil means a crisp vada.
- Drain and keep crisp. Lift out with a slotted spoon, let the oil drip back for a few seconds, and drain on a wire rack or paper towels. Between batches, let the oil come back up to temperature for a minute — this pause is essential for consistently crisp vadas. Serve within 20-30 minutes for maximum crunch.
Pro Tips for Perfect Results
- Respect the float test. Batter that floats makes vadas that are fluffy inside; batter that sinks makes them dense. Do not skip this check.
- Minimum water while grinding. Every extra spoonful of water makes shaping harder and frying greasier. Thick batter is non-negotiable.
- Hold 170-175°C. Too hot gives a dark, raw-centred vada; too cool gives an oily one. Adjust the flame between batches and test with a small batter ball each time.
- Wet hands, every single vada. Re-wet your palms before each one. Dry hands stick, tear the surface, and ruin the shape.
- Do not overcrowd the kadhai. Three to four vadas at a time in a standard kadhai. Crowding drops the oil temperature and the whole batch suffers.
- Fry to deep golden, not pale. Pale vadas look underdone because they are — the deep golden colour is where the real crunch lives. Trust the colour, not the clock.
- Serve fast. Vadas are at their peak in the first half hour. If you must hold them, keep them uncovered on a wire rack in a warm oven — covering traps steam and softens the crust.
- Salt the batter just before frying. Like idli batter, salt added too early can loosen the texture over time. Season right before you heat the oil.
Variations to Try
Sambar vada is the iconic serving style: soak hot vadas in piping-hot sambar for a minute so they drink it up, then serve with extra sambar ladled over. Curd vada (thayir vadai) soaks the vadas in warm water, squeezes them gently, and nestles them in whisked curd with chutneys — cool, tangy, and completely different. Rasam vada dunks them in peppery rasam. For the batter, try adding finely chopped onion and coconut pieces for a Karnataka-style vada, or a handful of drumstick leaves (murungai keerai) for the traditional Tamil keerai vadai. Maddur vada is the flat, crunchy Karnataka railway-station cousin made with rice flour and rava — no grinding needed. And mini cocktail vadas, bite-sized and extra crisp, are perfect party snacks with chutney for dipping.
Serving Suggestions
The classic tiffin plate is one or two medu vadas with hot sambar for dunking and coconut chutney alongside — plus idli if you are feeling generous. For sambar vada, place the vadas in a shallow bowl and ladle over enough hot sambar to half-submerge them; garnish with chopped onion and coriander. Filter coffee afterwards is traditional and non-negotiable in my book. Vadas also pair beautifully with tomato chutney or a spicy kara chutney for those who like heat. Serve on banana leaves for a festive touch.
Storage and Reheating
Medu vada is best eaten fresh — crispness fades within a couple of hours. That said, fried vadas keep 1 day at room temperature in an airtight container (they will soften) or 2 days refrigerated. To revive, reheat in a hot oven or air fryer at 180°C for 5-7 minutes until crisp again; avoid the microwave, which makes them chewy. The unseasoned ground batter keeps 1 day in the fridge — whip it again briefly before using, since it deflates on standing, and do the float test once more. Coconut chutney keeps 2-3 days refrigerated; the tempering keeps it fresh-tasting. Neither vadas nor chutney freeze particularly well.
Frequently Asked Questions
Why are my vadas dense and hard inside?
Under-aerated batter is the usual cause — the float test is your diagnostic. Whip longer until a test ball floats briskly. Old urad dal and too-thin batter also cause density. Also check your oil was not too hot, which sets the crust before the inside can puff.
Why did my vadas absorb so much oil?
Three likely culprits: oil below temperature when the vadas went in, overcrowding the kadhai, or batter that is too thin. Thin, watery batter cannot form a quick-sealing crust, so oil seeps in. Keep the batter thick, the oil at 170-175°C, and fry small batches.
My vadas broke apart in the oil. What happened?
The batter is too thin or too coarsely ground. It should be thick and completely smooth. A tablespoon of rice flour helps bind a slightly loose batter. Also make sure you slid the vada in gently — dropping it from a height can shatter a delicate shape.
Can I bake or air-fry medu vada instead?
You can, and the air fryer at 180°C for 12-15 minutes (flipping halfway, brushed lightly with oil) gives a respectable result — crisp-ish outside, soft inside. But it will not match the shattering crust of deep-fried vada; the hot oil is doing real structural work here. For guests and festivals, fry.
Can I make the batter in advance?
Yes — grind the batter (without salt and seasonings) the night before and refrigerate. It will deflate overnight, so whip it vigorously for a few minutes in the morning, do the float test again, then season and fry. Do not keep ground batter longer than 24 hours; it sours and loosens.
Why add a hole in the middle?
It is engineering, not decoration. The hole lets hot oil reach the centre of the thick batter, so the vada cooks through evenly instead of staying doughy inside. It also increases the crispy surface area — more crunch per bite. A vada without a hole is just a bonda with commitment issues.
Shaping that first vada — wet palm, thumb through the centre, a slightly wobbly ring sliding into shimmering oil — is one of the small satisfactions of Indian cooking. By the third batch your hands will know what to do, the kitchen will smell like a festival, and the plate of golden, crackling vadas in front of you will be proof that some techniques are worth learning properly. Serve them hot, and watch them disappear.