Recipe Card
These golden, protein-packed moong dal chillas are crisp at the edges, soft in the middle, and endlessly customisable. A wholesome North Indian breakfast the whole family will love.
Ingredients
- 300g (1.5 cups) yellow moong dal, rinsed well
- 2 tbsp rice flour (for extra crispness)
- 2.5cm (1 inch) piece of fresh ginger, roughly chopped
- 2 to 3 green chillies, stems removed
- 1 tsp cumin seeds
- 0.25 tsp asafoetida (hing) — optional
- 0.5 tsp turmeric powder
- 1 tsp salt, or to taste (add just before cooking)
- 1 medium onion (about 100g), finely chopped
- 1 medium tomato (about 100g), finely chopped and deseeded
- 3 tbsp finely chopped fresh coriander leaves
- 120ml (0.5 cup) water, plus more as needed for grinding
- 3 to 4 tbsp oil or ghee, for cooking the chillas
Instructions
- Soak the dal: Rinse the moong dal in 3 to 4 changes of water until the water runs mostly clear, then cover with plenty of fresh water and soak for 4 to 6 hours at room temperature (or up to 8 hours in the refrigerator). The grains should look plump and crush easily between your fingers. Drain completely in a colander — excess soaking water makes the batter thin and the chillas soggy.
- Grind to a smooth batter: Transfer the drained dal to a mixer grinder along with the ginger, green chillies, and cumin seeds. Add just 60ml (4 tablespoons) of water to start and grind to a completely smooth, thick paste, stopping to scrape down the sides. Add water a spoonful at a time only if the blades struggle — you are aiming for a batter like thick dosa batter, not a watery soup. A grainy batter gives grainy chillas, so be patient and grind in two batches if your jar is small.
- Rest and season: Pour the batter into a large bowl, whisk in the rice flour, turmeric, asafoetida, and salt until completely smooth, then whisk in the remaining water to reach a pourable consistency — it should coat the back of a spoon and fall in a slow, steady ribbon. Fold in the chopped onion, tomato, and coriander. Rest the batter for 10 to 15 minutes; this hydrates the rice flour and relaxes the batter so it spreads evenly.
- Heat the tawa properly: Place your tawa over medium-high heat and let it heat for 3 to 4 minutes until a few drops of water sprinkled on the surface sizzle and evaporate within 2 seconds. If using cast iron, rub it lightly with an oiled onion half or a folded kitchen towel dipped in oil. The tawa must be hot enough to set the batter on contact — too cool and the chilla sticks and turns pale; scorching hot and it browns before the inside cooks.
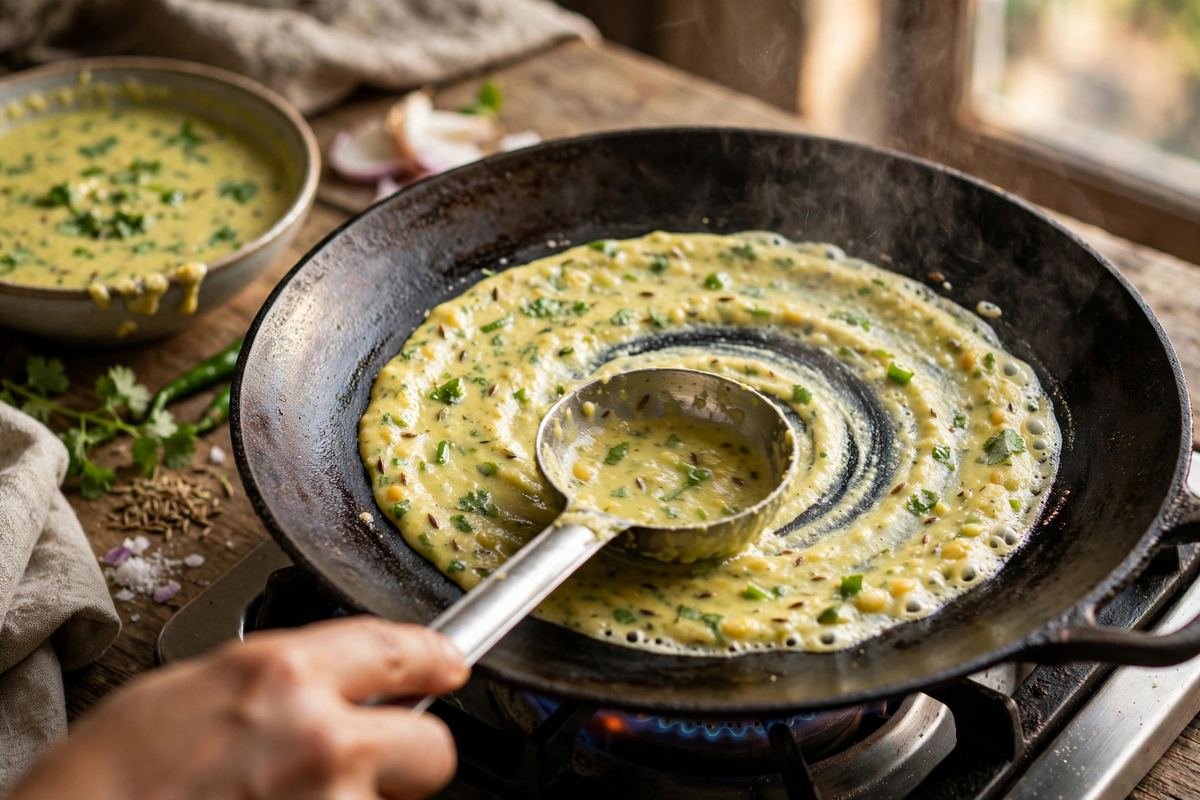
- Spread the chilla: Stir the batter well, then pour a ladleful (about 80ml) into the centre of the hot tawa. Working quickly from the centre outward, spiral the back of the ladle to spread it into a circle roughly 15 to 18cm across and about 3mm thick. Do not press down or go over the same spot twice — one confident spiral is all it takes. Drizzle half a teaspoon of oil around the edges.
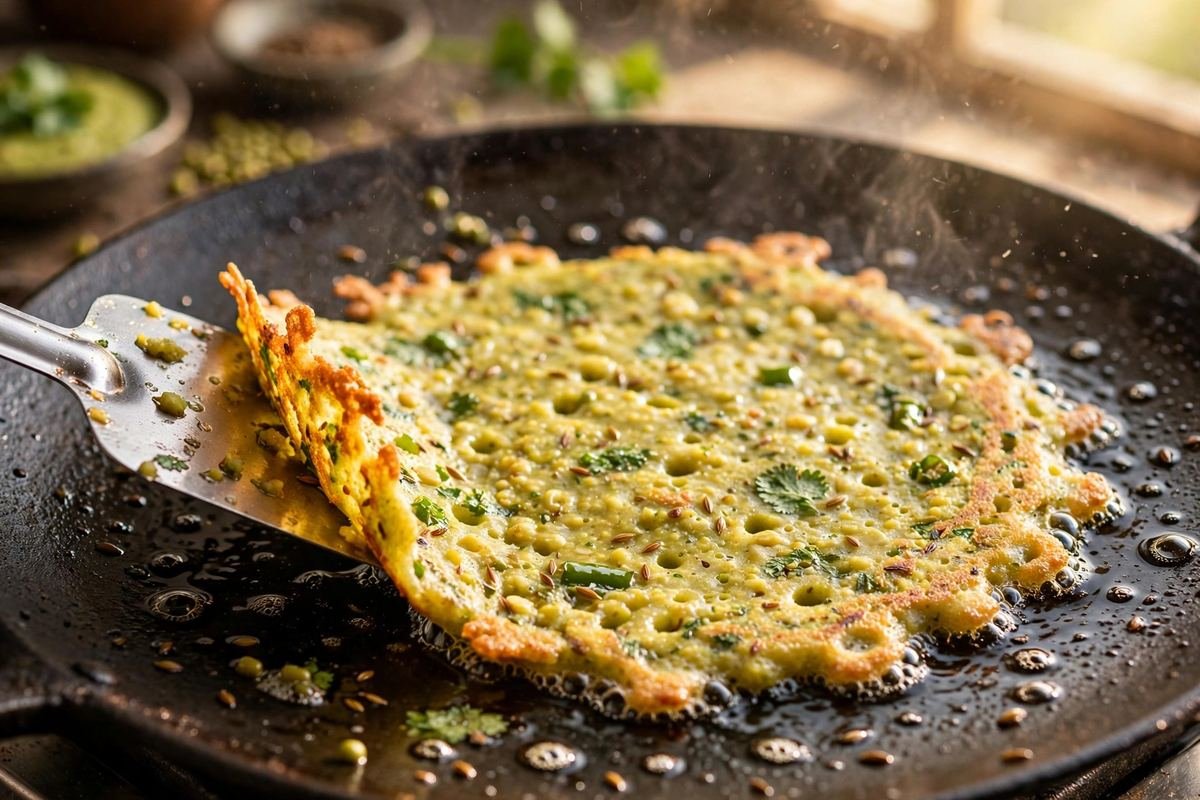
- Cook until golden: Let the chilla cook undisturbed for 2 to 3 minutes over medium heat. You will see the surface lose its wet sheen, tiny bubbles appear, and the edges lift and turn lacy and golden. Slide a flat spatula underneath — if the underside is deep golden with brown speckles, flip it confidently in one motion.
- Finish the second side: Cook the second side for 1 to 2 minutes, pressing very gently with the spatula so the centre makes full contact with the tawa. Drizzle a few more drops of oil if the tawa looks dry. The chilla is done when both sides are golden and it feels crisp at the edges but still pliable in the middle. Fold in half or roll up and transfer to a plate.
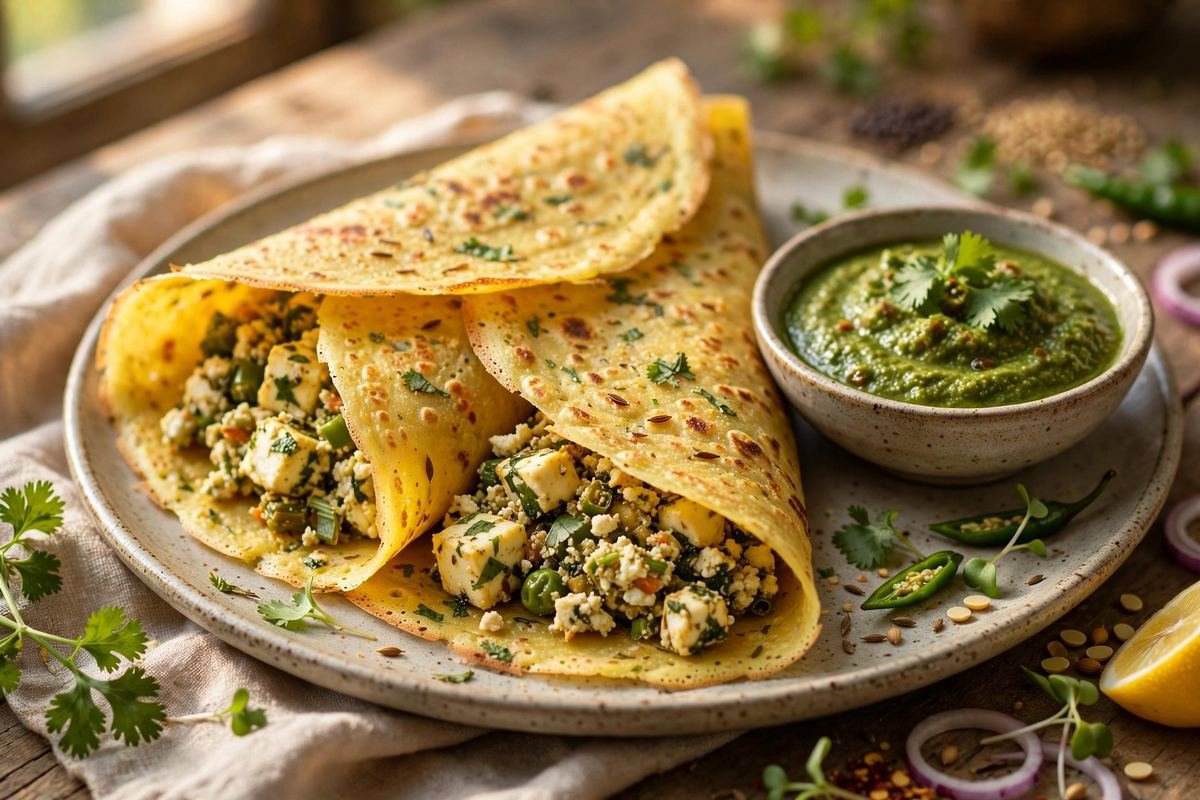
- Serve immediately: Chillas wait for no one — serve them straight off the tawa with green chutney, sweetened curd, or your favourite pickle. Between batches, wipe the tawa clean with a damp cloth if any bits stick, re-oil lightly, and give the batter a quick stir, as the heavier bits settle.
Tip: Read through the full post below for step-by-step photos, pro tips, variations and FAQs before you start cooking.
The Story Behind Moong Dal Chilla
Long before protein powders and overnight oats arrived in Indian kitchens, there was the chilla — one of the oldest breakfasts on the subcontinent, and arguably the wisest. In the homes of Uttar Pradesh, Rajasthan, Delhi, and Punjab, mornings have begun for generations with the soft hiss of dal batter hitting a hot tawa. The moong dal chilla, made from humble split yellow lentils, is the North Indian answer to the pancake: naturally gluten-free, packed with plant protein, and ready in the time it takes to brew a pot of chai.
What I love most about this dish is how unpretentious it is. There is no fermentation to babysit, no special flour to hunt down, no technique that takes years to master. You soak the dal, grind it with ginger and green chillies, and ladle it onto a hot griddle the way your grandmother did — in confident, widening circles. Within minutes you have something golden and lacy at the edges, tender in the centre, and deeply savoury in a way that keeps you full till lunch without the mid-morning slump that follows a sugary cereal.
On the streets of Old Delhi, vendors still make a version of this at dawn, topping each chilla with grated paneer or a spoonful of spiced potatoes, folding it like a wallet, and handing it over wrapped in newspaper with a smear of green chutney. At home, my version is simpler but no less satisfying: a plain, crisp chilla with finely chopped onions, tomatoes, and coriander stirred right into the batter, served with cool curd and fiery chutney. This recipe gives you that perfect texture — crisp enough to shatter slightly at the rim, soft enough to fold — plus all the little details that separate a good chilla from a great one.
Why You’ll Love This Recipe
- 24 grams of protein per serving — moong dal is one of the most protein-dense lentils, keeping you full for hours.
- No fermentation needed — unlike dosa batter, this is a soak, grind, and cook affair. Breakfast can be 30 minutes away.
- Naturally gluten-free — just lentils, spices, and vegetables, with no wheat in sight.
- Crisp edges, soft centre — the batter ratio in this recipe nails that perfect contrast every time.
- Endlessly customisable — add grated vegetables, stuff with paneer, or keep it plain and classic.
- Kid-friendly and lunchbox-approved — mild, soft, and easy to roll up with chutney inside.
- Budget cooking at its best — a handful of dal feeds four people generously.
Key Ingredients Explained
The star of this recipe is yellow moong dal (split and hulled mung beans) — about 1.5 cups or 300g. Choose dal that looks bright yellow and smells fresh; old, dull-looking dal takes longer to soften and grinds into a grainy batter. Moong dal is the ideal chilla lentil because it is light on the stomach, cooks quickly, and grinds into a naturally smooth batter without any added flour. Soak it for a minimum of 4 hours, though overnight in the fridge works beautifully too. The soaked dal should crush easily between your fingernails — that is your cue that it is ready for the grinder.
For that signature crispness, I add 2 tablespoons of rice flour to the batter. This is the quiet trick behind lacy, golden edges that stay crisp even as the chilla cools slightly. Rice flour fries up crisper than wheat flour and keeps the recipe gluten-free. If you do not have rice flour, fine semolina (sooji) works, or you can simply skip it — the chilla will be softer and more crepe-like, which many people prefer. Fresh ginger and green chillies are ground right in with the dal, perfuming the entire batter from within rather than sitting on top as an afterthought. Use 2 to 3 chillies for a gentle warmth, or push to 4 if your mornings need waking up.
The supporting cast matters too. Cumin seeds add an earthy, nutty depth, while a pinch of asafoetida (hing) aids digestion and gives that unmistakable savoury note found in the best street-style chillas — skip it if you are strictly gluten-free, as some commercial hing contains wheat. Turmeric lends the batter its sunny colour, and finely chopped onion, tomato, and coriander leaves are folded in just before cooking so they stay fresh and bright. A note on salt: add it only after grinding, right before you start cooking, because salt thins the batter over time and you want full control of the consistency.
Equipment You’ll Need
- Mixer grinder or high-speed blender for a silky batter
- Large mixing bowl for soaking and resting the batter
- Non-stick tawa or well-seasoned cast-iron griddle
- Flat ladle or small bowl for pouring and spreading
- Flat spatula for flipping
- Small bowl of oil or ghee with a spoon for drizzling
- 300g (1.5 cups) yellow moong dal, rinsed well
- 2 tbsp rice flour (for extra crispness)
- 2.5cm (1 inch) piece of fresh ginger, roughly chopped
- 2 to 3 green chillies, stems removed
- 1 tsp cumin seeds
- 0.25 tsp asafoetida (hing) — optional
- 0.5 tsp turmeric powder
- 1 tsp salt, or to taste (add just before cooking)
- 1 medium onion (about 100g), finely chopped
- 1 medium tomato (about 100g), finely chopped and deseeded
- 3 tbsp finely chopped fresh coriander leaves
- 120ml (0.5 cup) water, plus more as needed for grinding
- 3 to 4 tbsp oil or ghee, for cooking the chillas
- Soak the dal: Rinse the moong dal in 3 to 4 changes of water until the water runs mostly clear, then cover with plenty of fresh water and soak for 4 to 6 hours at room temperature (or up to 8 hours in the refrigerator). The grains should look plump and crush easily between your fingers. Drain completely in a colander — excess soaking water makes the batter thin and the chillas soggy.
- Grind to a smooth batter: Transfer the drained dal to a mixer grinder along with the ginger, green chillies, and cumin seeds. Add just 60ml (4 tablespoons) of water to start and grind to a completely smooth, thick paste, stopping to scrape down the sides. Add water a spoonful at a time only if the blades struggle — you are aiming for a batter like thick dosa batter, not a watery soup. A grainy batter gives grainy chillas, so be patient and grind in two batches if your jar is small.
- Rest and season: Pour the batter into a large bowl, whisk in the rice flour, turmeric, asafoetida, and salt until completely smooth, then whisk in the remaining water to reach a pourable consistency — it should coat the back of a spoon and fall in a slow, steady ribbon. Fold in the chopped onion, tomato, and coriander. Rest the batter for 10 to 15 minutes; this hydrates the rice flour and relaxes the batter so it spreads evenly.
- Heat the tawa properly: Place your tawa over medium-high heat and let it heat for 3 to 4 minutes until a few drops of water sprinkled on the surface sizzle and evaporate within 2 seconds. If using cast iron, rub it lightly with an oiled onion half or a folded kitchen towel dipped in oil. The tawa must be hot enough to set the batter on contact — too cool and the chilla sticks and turns pale; scorching hot and it browns before the inside cooks.
- Spread the chilla: Stir the batter well, then pour a ladleful (about 80ml) into the centre of the hot tawa. Working quickly from the centre outward, spiral the back of the ladle to spread it into a circle roughly 15 to 18cm across and about 3mm thick. Do not press down or go over the same spot twice — one confident spiral is all it takes. Drizzle half a teaspoon of oil around the edges.
- Cook until golden: Let the chilla cook undisturbed for 2 to 3 minutes over medium heat. You will see the surface lose its wet sheen, tiny bubbles appear, and the edges lift and turn lacy and golden. Slide a flat spatula underneath — if the underside is deep golden with brown speckles, flip it confidently in one motion.
- Finish the second side: Cook the second side for 1 to 2 minutes, pressing very gently with the spatula so the centre makes full contact with the tawa. Drizzle a few more drops of oil if the tawa looks dry. The chilla is done when both sides are golden and it feels crisp at the edges but still pliable in the middle. Fold in half or roll up and transfer to a plate.
- Serve immediately: Chillas wait for no one — serve them straight off the tawa with green chutney, sweetened curd, or your favourite pickle. Between batches, wipe the tawa clean with a damp cloth if any bits stick, re-oil lightly, and give the batter a quick stir, as the heavier bits settle.
Pro Tips for Perfect Results
- Grind thick, then thin: Always grind the dal with minimal water and adjust consistency afterwards. It is easy to thin a thick batter; it is nearly impossible to thicken a watery one without adding flour that dulls the flavour.
- Do not skip the rest: Those 10 to 15 minutes of resting make the batter spread smoothly instead of tearing. If the batter thickens while resting, whisk in a tablespoon of water before cooking.
- Master the tawa temperature: The water-drop test never lies. If the batter sets instantly into a lacy pattern, you are good; if it sits pale and wet, wait another minute. Reduce to medium once the chilla is spread so the inside cooks through.
- Keep the chillas thin: Thick chillas turn dense and doughy. Aim for 3mm — thin enough to crisp, thick enough to hold the vegetables.
- Chop vegetables finely: Chunky onion and tomato tear the delicate batter when spreading. A fine, even dice keeps every bite balanced.
- Add salt last: Salt draws moisture out of the vegetables and thins the batter. Season the base batter, cook one test chilla, then adjust salt and water for the rest of the batch.
- Re-crisp leftovers: Day-old chillas revive beautifully — warm them on a hot dry tawa for a minute per side and they crisp right back up.
Variations to Try
Paneer-Stuffed Chilla: The street-style upgrade. Crumble 150g of fresh paneer and toss with salt, crushed black pepper, finely chopped green chilli, and coriander. Spread the chilla, cook one side, then scatter the paneer over half, fold, and press gently until the cheese softens. It turns breakfast into something worthy of guests.
Vegetable-Loaded Chilla: Stir finely grated carrot, chopped spinach, sweetcorn kernels, or grated beetroot into the batter for colour and extra nutrition. Beetroot gives a stunning pink chilla that children find irresistible, and the sweetness pairs beautifully with the savoury dal.
Oats-Moong Chilla: Replace the rice flour with 3 tablespoons of powdered rolled oats for extra fibre and a slightly nuttier flavour. This version stays soft rather than crisp, making it ideal for lunchboxes.
Pesarattu-Style: Go the Andhra route — use whole green moong instead of yellow dal, add extra ginger, and serve with ginger chutney and upma on the side. The green moong gives an earthier flavour and an even bigger protein punch.
Mini Chillas for Kids: Make small 8cm chillas, roll each around a spoonful of chutney or cheese, and secure with a toothpick. They disappear from plates at an alarming speed.
Serving Suggestions
A moong dal chilla is never served alone — the accompaniments are half the joy. The classic pairing is fresh green chutney made from coriander, mint, green chilli, and lemon, whose sharp brightness cuts through the earthy dal. A bowl of cool, lightly salted curd (or sweetened curd if you prefer) balances the heat and adds protein. For a full North Indian breakfast spread, add masala chai, a spoonful of mango or mixed vegetable pickle, and sliced onions with lemon. Chillas also make an excellent light dinner with a simple moong dal soup or rasam on the side. If you are packing them for a lunchbox, spread chutney inside, roll tightly, and wrap in foil — they stay delicious at room temperature for 3 to 4 hours.
Storage and Reheating
The batter is the real make-ahead hero here: it keeps in an airtight container in the refrigerator for up to 2 days. Stir well before using and add a splash of water if it has thickened. Note that the chopped vegetables will release water over time, so for the freshest results, store plain batter and fold in the vegetables just before cooking. Cooked chillas keep for 1 day in the fridge, layered between sheets of parchment so they do not stick. Reheat on a hot tawa for a minute per side — never microwave them, which turns the crisp edges rubbery. The batter does not freeze well once vegetables are added, but plain ground dal batter (without salt or vegetables) freezes beautifully for up to a month; thaw overnight in the fridge, then season and cook as usual.
Frequently Asked Questions
Can I make chillas without soaking the dal for hours?
In a hurry, you can quick-soak the dal in very hot (not boiling) water for 45 to 60 minutes. The texture will be slightly less silky than a proper 4-hour soak, but perfectly acceptable for a weekday breakfast. Do not skip soaking entirely — unsoaked dal will not grind smooth and the chillas will taste raw and gritty.
Why are my chillas breaking or sticking to the tawa?
Three usual suspects: the tawa was not hot enough when the batter hit it, the batter is too thin, or the tawa needs seasoning. Make sure the surface passes the water-drop test, keep the batter thick enough to coat a spoon, and if using cast iron, rub it with an oiled onion before the first chilla. A good non-stick tawa removes most of this worry.
Is moong dal chilla good for weight loss and diabetics?
It is one of the best Indian breakfasts for both goals. Moong dal has a low glycaemic index and is rich in protein and fibre, which keeps blood sugar steady and hunger away. Cook with minimal oil on a non-stick tawa, load it with vegetables, and pair with curd rather than sugary chai for the healthiest plate.
Can I use whole green moong instead of yellow moong dal?
Absolutely — that gives you pesarattu, the Andhra cousin of this dish. Soak whole green moong for 6 to 8 hours (the skin needs longer), grind with extra ginger and green chillies, and expect a slightly coarser, earthier chilla. Both versions are delicious; yellow dal is milder and quicker.
Can I make the batter the night before?
Yes, and it is a brilliant time-saver. Grind the dal with the spices, refrigerate the plain batter, and in the morning just whisk in salt, water to adjust, and the chopped vegetables. You will have hot chillas on the table in 15 minutes.
How do I make the chillas extra crispy?
Three things: keep the batter on the thicker side, spread the chilla thin, and be generous with the oil around the edges. A screaming-hot tawa for the first 30 seconds sets the lacy crust; then reduce the heat so the inside cooks through without burning.
There is a quiet satisfaction in a breakfast this simple done this well — a golden, crackling chilla, steam rising, chutney waiting. Make this recipe once, and I promise it will earn a permanent place in your morning rotation, the way it has in mine. Happy cooking, and do not forget the extra drizzle of ghee on top — some traditions exist for very good reasons.