Recipe Card
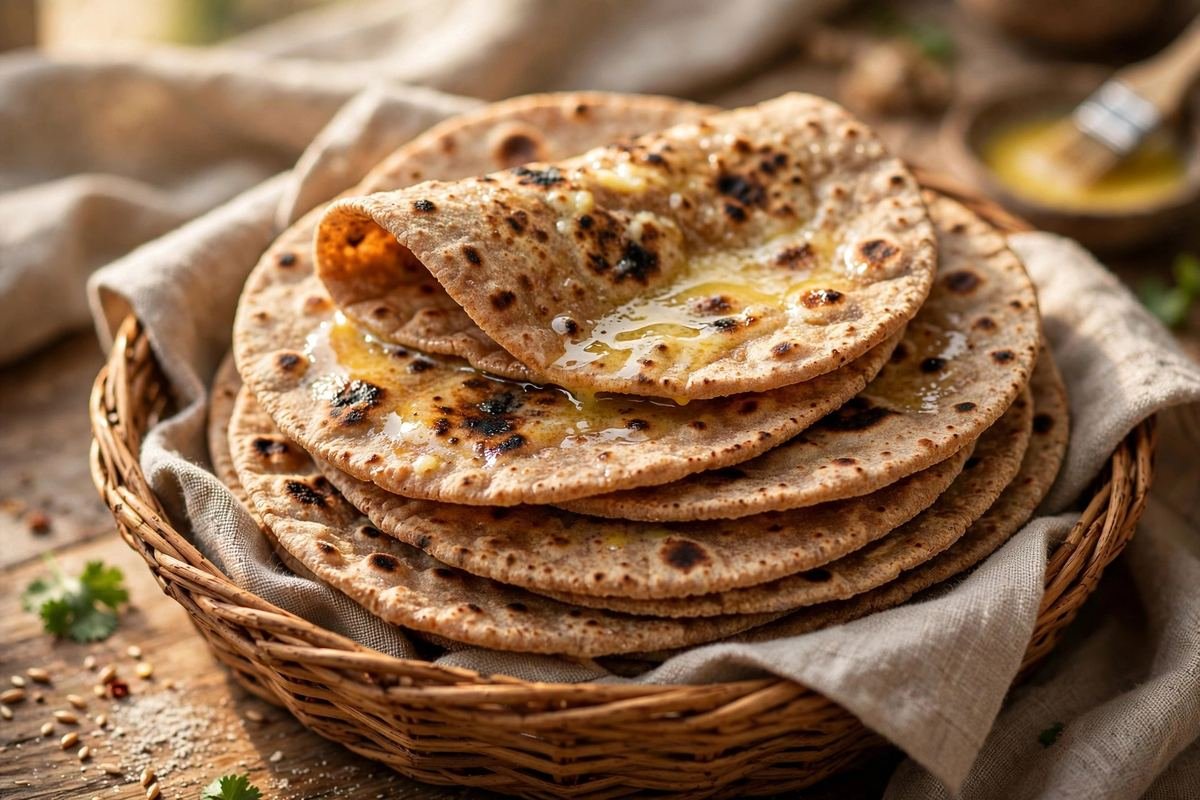
Get restaurant-style tandoori roti right on your stovetop. These whole-wheat rotis puff up with beautiful charred spots and stay soft for hours, no tandoor required.
Ingredients
- 2 cups (250g) whole-wheat flour (chapati atta), plus extra for dusting
- ¾ cup (180ml) lukewarm water, plus more as needed
- 1 tbsp oil or melted ghee, plus more ghee or butter for brushing
- ½ tsp salt
- ¼ cup water in a small bowl, for sticking the roti to the tawa
Instructions
- Mix and knead the dough. Combine the flour and salt in a large bowl. Add the oil and rub it in with your fingertips until the flour looks like coarse crumbs. Pour in the lukewarm water a little at a time, mixing with your hand, until a shaggy dough comes together. Knead for 6–8 minutes on a lightly floured surface, pushing with the heel of your palm and folding, until the dough is smooth, soft, and springs back lightly when poked. It should feel like a soft earlobe — pliable but not sticky.
- Rest the dough. Cover the dough with a damp kitchen towel or an inverted bowl and rest for at least 30 minutes, and up to 1 hour. This rest is not optional: it relaxes the gluten so the rotis roll out thin without springing back, and it lets the flour fully hydrate, which is the real secret to soft rotis. If you are in a hurry, 20 minutes is the absolute minimum.
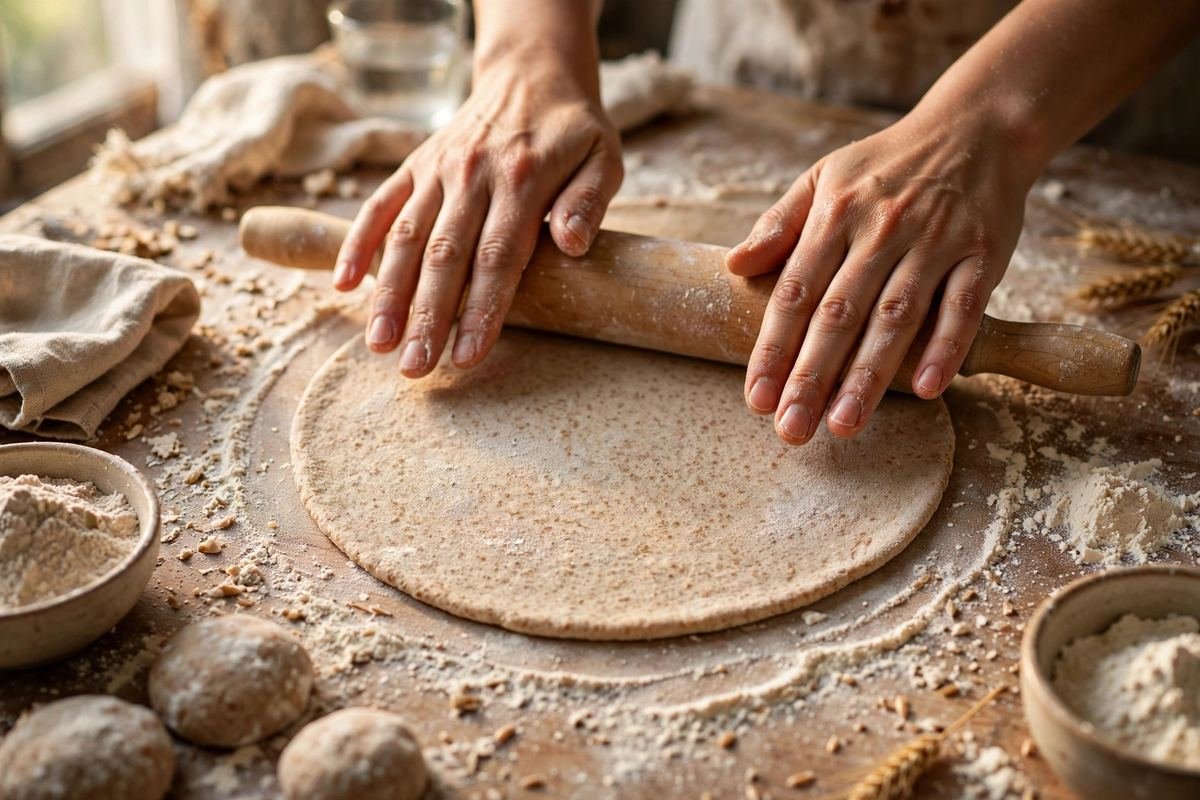
- Divide and roll. Knead the rested dough briefly for 30 seconds to smooth it out. Divide into 10 equal portions and roll each into a smooth ball, tucking the edges underneath. Working with one ball at a time (keep the rest covered), flatten it, dust lightly with dry flour, and roll into a circle about 6–7 inches across and roughly 3mm thick — slightly thicker than a regular chapati. Try to keep the thickness even; thin spots will burn before thick spots cook.
- Stick it to the tawa. Heat your tawa over medium-high heat until a drop of water sizzles and evaporates within a second or two. Brush the top surface of the rolled roti generously with plain water — this is the glue. Immediately place the roti water-side down on the hot tawa and press gently all over with a flat spatula or your fingertips (careful, it’s hot) so the entire surface makes contact and sticks.
- Cook the base. Let the roti cook on the tawa for 30–45 seconds, until you see small bubbles forming on the surface and the edges look set. The roti should now be firmly stuck to the tawa — give it a gentle nudge with the tongs; if it doesn’t slide, you’re good.
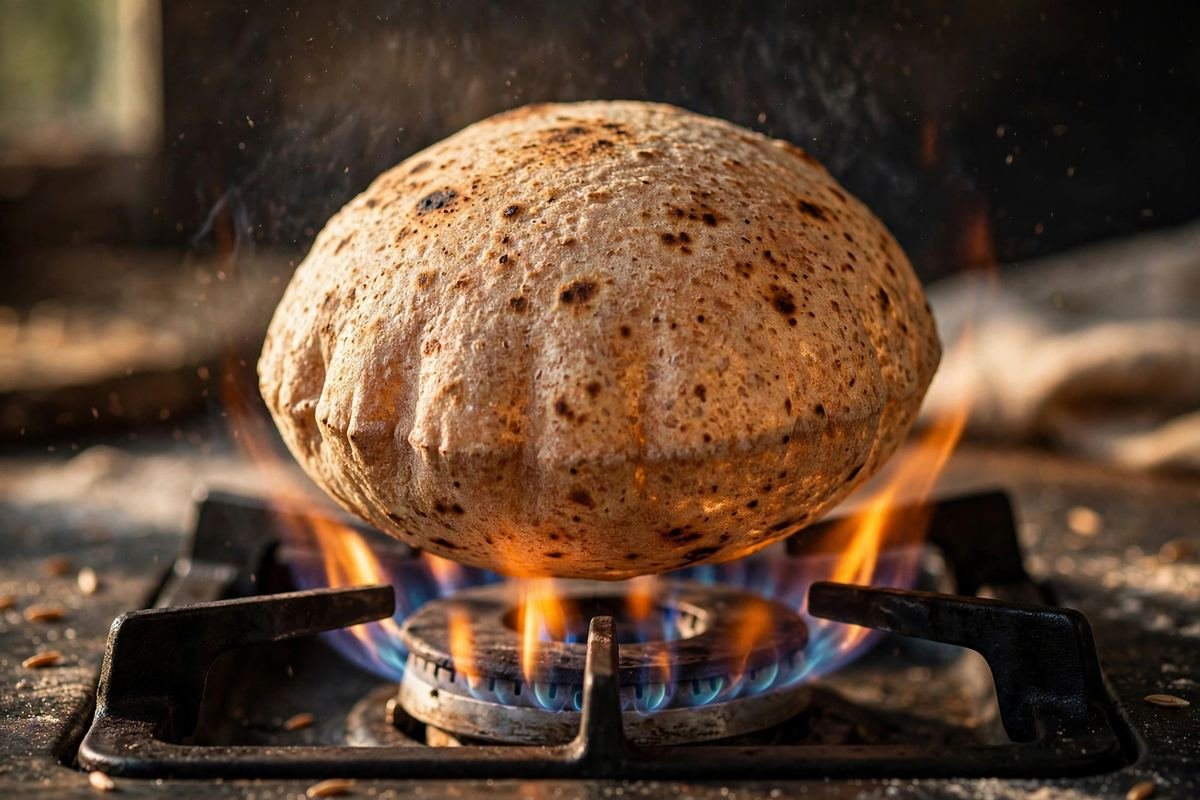
- Char over the flame. Now the fun part. Using a thick oven mitt or folded towel, pick up the tawa and flip it upside down so the roti faces the gas flame, holding it 2–3 inches above the flame. Move the tawa slowly in small circles so the flame licks the whole surface evenly. Within 30–60 seconds the roti will puff up and develop golden-brown to dark charred blisters. Watch it constantly — it goes from perfect to burnt in seconds. If any spot chars too fast, tilt the tawa away.
- Alternative flame method. If flipping the tawa feels scary, cook the roti on the tawa until it’s about 80% done on both sides (flip once with tongs), then lift it with tongs and place it directly on the gas flame for 10–15 seconds per side, letting it puff and char. This gives a slightly different, equally delicious result and is how many home cooks do it.
- Butter and stack. Slide the finished roti onto a plate, brush generously with ghee or butter while it’s steaming hot, and immediately cover with a kitchen towel. Stack each new roti on top and keep covered — the trapped steam is what keeps the whole batch soft. Repeat with the remaining dough balls.
- Serve hot. These are best eaten within an hour or two of making, while they’re warm and supple. If they cool down, 10 seconds on a hot tawa or a few seconds in the microwave under a damp towel brings them right back.
Tip: Read through the full post below for step-by-step photos, pro tips, variations and FAQs before you start cooking.
The Magic of Tandoori Roti, Right From Your Stovetop
There is something about the smell of a tandoor that stops you in your tracks. That heady mix of scorched wheat, blistering heat, and smoke has a way of pulling you toward a roadside dhaba or an old Delhi restaurant kitchen, where a cook in a flour-dusted apron slaps discs of dough onto the glowing clay walls of a tandoor and peels them off seconds later, puffed and blistered and impossibly alive. For most of us, a real tandoor — that cylindrical clay oven burning at fierce temperatures — is a fantasy. It is huge, it is expensive, and it has no place in a modern home kitchen. But here is the wonderful secret: you can make tandoori roti that tastes shockingly close to the real thing on an ordinary tawa, right over your gas flame.
This tandoori roti on tawa is a whole-wheat bread, not the refined-flour naan you might be imagining. It is rustic and wholesome, the kind of bread that grew up alongside the tandoor itself in the villages and dhabas of Punjab and Uttar Pradesh. Traditionally, whole-wheat rotis slapped onto a tandoor wall develop a signature leopard-spotted char and a chewy-tender bite that a plain tawa roti simply cannot match. The trick we use at home is to roll the roti, cook it partially on a hot tawa, and then flip the tawa upside down over the flame — or place the roti directly on the flame — so the surface kisses open fire. That direct flame contact is what creates the charred blisters and the smoky flavor that make you close your eyes on the first bite.
What I love most about this recipe is how democratic it is. You do not need any special equipment beyond a tawa and a stove. The dough is just whole-wheat flour, water, salt, and a touch of oil — no yeast, no fuss. The resting time does the heavy lifting, relaxing the gluten so the rotis roll out easily and stay soft. Once you get the rhythm — roll, cook, char, butter — you will turn out a whole stack in about twenty minutes, and your kitchen will smell like a dhaba in the best possible way. Serve these alongside dal makhani, paneer butter masala, or a simple rajma, and watch them disappear.
One honest note: these are not going to stay pillowy for hours if you leave them naked on a plate. Bread made without a real tandoor’s intense radiant heat benefits from being brushed with ghee or butter and stacked under a kitchen towel, which traps steam and keeps them supple. Do that, and they will still be soft and foldable when the last curry is being mopped up. This is the recipe I make whenever we have guests for an Indian meal and I want the bread to feel like an event rather than an afterthought.
Why You’ll Love This Recipe
- No tandoor needed — an ordinary tawa and gas flame give you authentic char and smokiness
- Wholesome whole wheat — no maida, just atta, so it’s the everyday-healthy bread you already make, elevated
- Stays soft for hours — the ghee-brush and towel-stack trick keeps every roti pliable
- Beginner friendly — if you can roll a chapati, you can make this; the charring step looks dramatic but takes seconds
- Pairs with everything — dal, paneer, chicken curry, kebabs, or just torn and dunked in ghee and sugar like childhood
Key Ingredients Explained
The ingredient list is short, which means every item earns its place. Start with whole-wheat flour (atta), and use the finely milled chapati atta you would normally buy, not coarse wholemeal. Fine atta absorbs water evenly and rolls into smooth, thin discs that blister properly. If your atta is very fresh and thirsty, you may need an extra spoon or two of water; if it is older, a touch less. The goal is a soft, pliable dough that does not stick to your fingers — firmer than naan dough, softer than play-dough.
Water should be lukewarm, not hot. Lukewarm water relaxes the flour proteins and gives you a softer dough with less kneading. Add it gradually — flour hydration varies by brand, season, and humidity, so there is no magic fixed quantity, only the right feel. Salt is non-negotiable; unsalted roti tastes flat and papery. About half a teaspoon per two cups of flour is the sweet spot.
A tablespoon of oil or ghee kneaded into the dough (called moyan in Hindi) shortens the gluten strands slightly, which keeps the rotis tender instead of chewy-tough. You can skip it, but the texture is noticeably better with it. For brushing at the end, use ghee or butter — this is not the place for restraint. The fat seals in steam, adds flavor, and gives the rotis that glossy restaurant finish. Water for sticking is the cleverest part of the method: you brush the underside of the rolled roti with water before placing it on the hot tawa, and that moisture glues the roti to the tawa so you can flip the whole tawa upside down over the flame without the roti falling into the burner. It sounds like a magic trick the first time; by the third roti it feels completely natural.
Equipment You’ll Need
- A flat tawa or griddle — cast iron or hard-anodized works best; non-stick is okay but won’t char as deeply
- A rolling pin and board (chakla-belan)
- A pair of tongs for handling the hot roti
- A pastry brush or clean cloth for applying water and ghee
- A kitchen towel or roti cloth for stacking
- A gas stove — the open flame step needs gas; on induction or electric, char the roti on a wire rack over the hot coil or under a broiler instead
- 2 cups (250g) whole-wheat flour (chapati atta), plus extra for dusting
- ¾ cup (180ml) lukewarm water, plus more as needed
- 1 tbsp oil or melted ghee, plus more ghee or butter for brushing
- ½ tsp salt
- ¼ cup water in a small bowl, for sticking the roti to the tawa
- Mix and knead the dough. Combine the flour and salt in a large bowl. Add the oil and rub it in with your fingertips until the flour looks like coarse crumbs. Pour in the lukewarm water a little at a time, mixing with your hand, until a shaggy dough comes together. Knead for 6–8 minutes on a lightly floured surface, pushing with the heel of your palm and folding, until the dough is smooth, soft, and springs back lightly when poked. It should feel like a soft earlobe — pliable but not sticky.
- Rest the dough. Cover the dough with a damp kitchen towel or an inverted bowl and rest for at least 30 minutes, and up to 1 hour. This rest is not optional: it relaxes the gluten so the rotis roll out thin without springing back, and it lets the flour fully hydrate, which is the real secret to soft rotis. If you are in a hurry, 20 minutes is the absolute minimum.
- Divide and roll. Knead the rested dough briefly for 30 seconds to smooth it out. Divide into 10 equal portions and roll each into a smooth ball, tucking the edges underneath. Working with one ball at a time (keep the rest covered), flatten it, dust lightly with dry flour, and roll into a circle about 6–7 inches across and roughly 3mm thick — slightly thicker than a regular chapati. Try to keep the thickness even; thin spots will burn before thick spots cook.
- Stick it to the tawa. Heat your tawa over medium-high heat until a drop of water sizzles and evaporates within a second or two. Brush the top surface of the rolled roti generously with plain water — this is the glue. Immediately place the roti water-side down on the hot tawa and press gently all over with a flat spatula or your fingertips (careful, it’s hot) so the entire surface makes contact and sticks.
- Cook the base. Let the roti cook on the tawa for 30–45 seconds, until you see small bubbles forming on the surface and the edges look set. The roti should now be firmly stuck to the tawa — give it a gentle nudge with the tongs; if it doesn’t slide, you’re good.
- Char over the flame. Now the fun part. Using a thick oven mitt or folded towel, pick up the tawa and flip it upside down so the roti faces the gas flame, holding it 2–3 inches above the flame. Move the tawa slowly in small circles so the flame licks the whole surface evenly. Within 30–60 seconds the roti will puff up and develop golden-brown to dark charred blisters. Watch it constantly — it goes from perfect to burnt in seconds. If any spot chars too fast, tilt the tawa away.
- Alternative flame method. If flipping the tawa feels scary, cook the roti on the tawa until it’s about 80% done on both sides (flip once with tongs), then lift it with tongs and place it directly on the gas flame for 10–15 seconds per side, letting it puff and char. This gives a slightly different, equally delicious result and is how many home cooks do it.
- Butter and stack. Slide the finished roti onto a plate, brush generously with ghee or butter while it’s steaming hot, and immediately cover with a kitchen towel. Stack each new roti on top and keep covered — the trapped steam is what keeps the whole batch soft. Repeat with the remaining dough balls.
- Serve hot. These are best eaten within an hour or two of making, while they’re warm and supple. If they cool down, 10 seconds on a hot tawa or a few seconds in the microwave under a damp towel brings them right back.
Pro Tips for Perfect Results
- Don’t skip the rest. Thirty minutes of resting does more for softness than any amount of kneading. Plan it into your prep.
- Get the tawa properly hot. A lukewarm tawa won’t stick the roti properly and gives pale, leathery bread. The water-drop sizzle test never lies.
- Water, not oil, is the glue. Brushing the roti’s underside with water before it hits the tawa is what lets you flip the tawa over the flame. Skip it and the roti will slide off.
- Roll evenly. Uneven thickness means burnt thin spots and raw thick spots. Rotate the roti a quarter-turn between rolls to keep it round and even.
- Watch the flame like a hawk. Charring takes under a minute. Keep the tawa moving in slow circles so no single spot takes the full blast.
- Butter immediately. Brush with ghee the second the roti comes off the heat, while steam is still rising — that’s when it absorbs best.
- Stack under a towel. Every roti goes straight into the covered stack. This single habit is the difference between soft rotis and frisbees.
- Fresh dough, fresh rotis. The dough can rest up to 2 hours at room temperature, but cook the rotis fresh — reheated-from-raw never tastes as good.
Variations to Try
Once you have the basic technique down, this roti is a canvas. Garlic tandoori roti: brush the hot roti with garlic-infused ghee and scatter finely chopped coriander over it — a dead ringer for restaurant garlic naan’s rustic cousin. Butter tandoori roti: go heavy on the butter and finish with a pinch of chaat masala for a dhaba-style treat. Missi-style: knead 2 tablespoons of besan (chickpea flour), a pinch of ajwain, and chopped onions into the dough for a savory, spiced version. Cheese-stuffed: roll two thin rotis, sandwich grated cheese and green chilies between them, seal the edges, and cook as usual — the cheese melts into a gooey center. Whole-grain mix: replace a quarter of the wheat flour with jowar or bajra flour for a nuttier, heartier bread (roll slightly thicker, as these flours crack more easily).
Serving Suggestions
Tandoori roti is the ultimate supporting actor — it exists to scoop, mop, and wrap. Serve it alongside dal makhani or dal tadka, where its charred edges soak up the creamy lentils beautifully. It is magnificent with paneer butter masala, shahi paneer, or kadhai paneer, and it stands up to robust non-vegetarian curries like butter chicken, rogan josh, or keema. For a simple weeknight meal, pair it with aloo-gobi, baingan bharta, or a bowl of rajma plus sliced onions and lemon wedges. It also makes an excellent wrap bread: spread with green chutney, layer with tandoori chicken or paneer tikka, onions, and mint, and roll up. And never underestimate the childhood classic — a hot tandoori roti torn into pieces, tossed with ghee and a spoonful of sugar.
Storage and Reheating
Fresh is best, but leftovers keep well. Store cooled rotis in an airtight container or zip-lock bag at room temperature for up to 24 hours, or refrigerate for up to 3 days — always with the ghee brushed on, as the fat layer slows staling. To reheat, sprinkle the roti lightly with water and warm it on a hot tawa for 20–30 seconds per side until supple, or wrap a stack in a damp kitchen towel and microwave for 20–30 seconds. For longer storage, freeze rotis with squares of parchment paper between them in a freezer bag for up to a month; thaw at room temperature and reheat on the tawa. Avoid reheating in a dry oven, which sucks out moisture and turns them crisp.
Frequently Asked Questions
Can I make this on an induction or electric stove?
Yes, with a workaround. The upside-down tawa trick needs an open gas flame. On induction or electric, cook the roti on the tawa until done on both sides, then char it on a wire cooling rack set directly over the hot coil, or finish it under a preheated oven broiler for 30–60 seconds, watching closely. You’ll still get lovely blisters.
Why did my roti fall off the tawa when I flipped it?
Either the tawa wasn’t hot enough when the roti went on, or the water layer was too thin. The tawa must be properly preheated so the water steams instantly and glues the dough down, and the roti needs a generous, even brushing of water. Also, make sure you press the roti down firmly in the first few seconds.
Why are my rotis hard instead of soft?
The usual suspects: dough that was too stiff (add water until it’s genuinely soft), skipped or short resting time, overcooking on the tawa before charring, or not covering the stack with a towel. Fix those four and your rotis will stay soft.
Can I use all-purpose flour instead of whole wheat?
You can, and you’ll get something closer to naan — softer and chewier, but less wheaty in flavor. Whole wheat is traditional for tandoori roti and gives the characteristic rustic taste and char. A 50-50 mix is a nice compromise if you want extra softness.
How do I keep rotis soft for a dinner party?
Brush each with ghee, stack under a thick kitchen towel inside a casserole dish or roti box, and keep the lid on until serving. They’ll stay warm and soft for a good hour. Make them as close to serving time as you can.
Is this the same as naan?
Not quite. Naan is leavened (with yeast or baking powder) and made with refined flour and usually yogurt, giving it a pillowy, tangy character. Tandoori roti is unleavened whole-wheat bread — denser, wheaty, and rustic. Both are traditionally baked in a tandoor, hence the shared name.
There is a particular joy in pulling a blistered, puffed roti off the flame with your own tongs and knowing no restaurant was involved. This tandoori roti on tawa turns an ordinary weeknight dal-and-sabzi dinner into something that feels celebratory, and once the technique clicks, you’ll wonder why you ever settled for plain chapatis when guests came over. Roll, stick, char, butter — and don’t forget to make extra, because the cook always deserves the first hot one.